Wi-Fi Troubleshooting on Windows: Find Out Why Your Wi-Fi Is Slow or Dropping
0 / 9 steps
The goal
By the end you will have checked your Wi-Fi signal, tried the cheap fixes in the right order (each one explained click by click on Windows), picked a better Wi-Fi channel, and measured your signal around the house with a phone app instead of a laptop.
Windows and Android. The click-by-click steps are for Windows 10 and 11. Step 8 uses an Android phone. Menu names change a little between Windows versions, so if yours says something slightly different, look for the closest match. Everything here is safe and reversible except step 9, which is marked.
Words in this lesson
Hover (or tap and hold) a dotted word for a quick definition. Every word is also in the StashGrid glossary.
- SSID — the name of a Wi-Fi network
- Band and channel — the lane of radio your Wi-Fi uses
- dBm — signal strength: closer to zero is stronger
- Router — the box that connects your home to the internet
- Gateway — the address of your router
Why this lesson. “The Wi-Fi is slow” is the most common tech complaint in any house. Most of the time the fix is cheap and takes minutes, but nobody explains which fix to try first. This lesson puts them in order, from free and harmless to last resort.
Rule one of Wi-Fi: it is a radio. Radios do not like walls, microwaves or neighbours. Most of what follows is about getting out of their way. — Nyx
Before you start. You need a Windows computer on your Wi-Fi, and ideally an Android phone for step 8. If you want the command promptIn plain words: A window where you type instructions instead of clicking. The shortcut name is cmd.Technical: Windows’ text-mode shell (cmd.exe). PowerShell is a newer one. On a Mac the equivalent is Terminal.Click for the full glossary entry version of step 2, here is how to open one. Not sure whether the problem is Wi-Fi at all? The DHCP lesson covers the “connected but no internet” case.
Steps
01Rule out the obvious
Before touching any settings, check these. They solve more problems than everything else combined.
- Is it only your device? Try a phone or another computer on the same Wi-Fi. If only one device is slow, the problem is that device, not the routerIn plain words: The box that connects your home to the internet and passes data between networks.Technical: Forwards packets between networks. At home it is usually also the Wi-Fi access point and the DHCP server.Click for the full glossary entry.
- Are you on the right network? Many homes have two, such as one name for 2.4 GHz and a second ending in “-5G.” Check the name you are connected to.
- How far are you from the router? Walls, floors, fish tanks, mirrors and microwave ovens weaken the signal. Move closer and test again.
- Is anyone else using a lot? A big download, a game update or a video call can slow everyone.
Why this matters. If you do not first work out whether it is one device, one room or the whole house, you will fix the wrong thing.
02Read your signal in Windows
Click the Wi-Fi icon at the right of the taskbar (it looks like a fan of curved lines, near the clock). More bars is better. For more detail:
- Open Settings (Windows key + I).
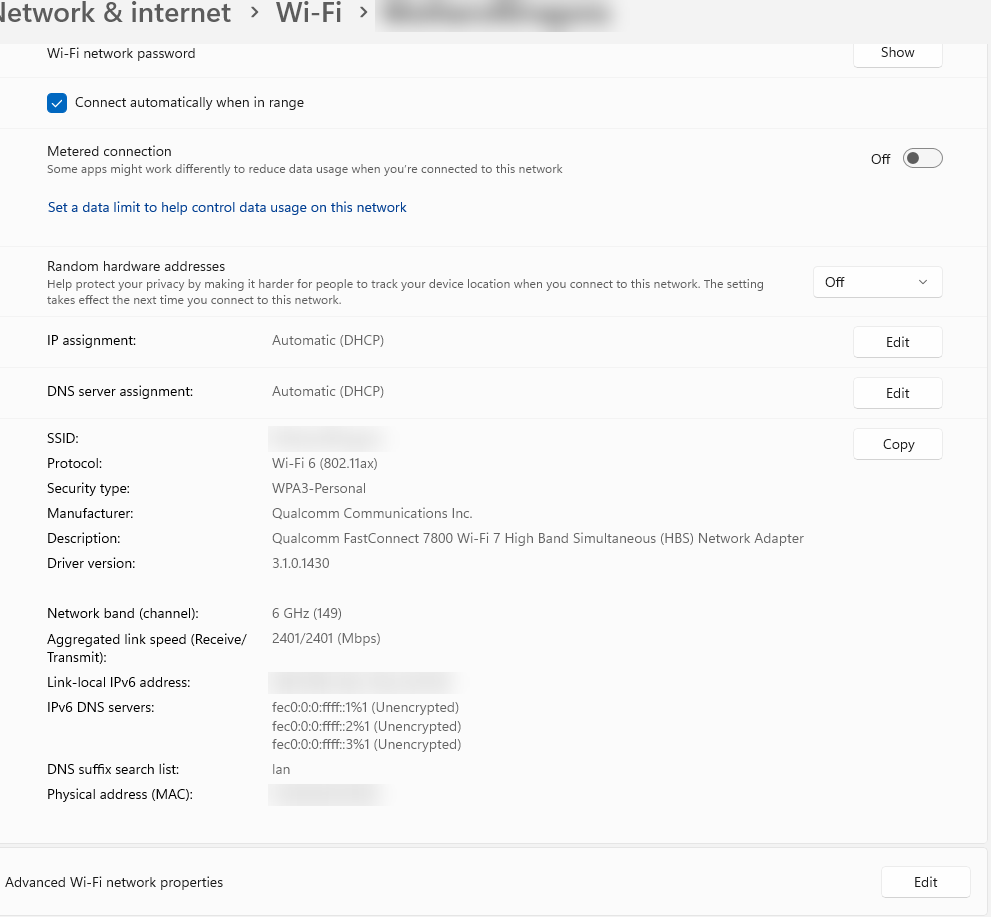
- Choose Network & internet, then Wi-Fi, then your network’s Properties (on Windows 11) or click your connected network (Windows 10).
- Scroll to find Network band (2.4 GHz or 5 GHz), Network channelIn plain words: Wi-Fi uses lanes of radio. If your neighbour is in the same lane, you slow each other down.Technical: 2.4 GHz and 5 GHz are bands, split into channels. On 2.4 GHz only 1, 6 and 11 do not overlap.Click for the full glossary entry and Link speed.
Prefer a command promptIn plain words: A window where you type instructions instead of clicking. The shortcut name is cmd.Technical: Windows’ text-mode shell (cmd.exe). PowerShell is a newer one. On a Mac the equivalent is Terminal.Click for the full glossary entry? This prints the same information, including a signal percentage:
> netsh wlan show interfaces
Look at Signal (higher is better), Channel and Receive rate and Transmit rate (your actual link speed in Mbps).
Why this matters. 5 GHz is faster but does not travel as far through walls. 2.4 GHz reaches further but is slower and more crowded. Knowing which one you are on explains many “it is fast in the kitchen and slow upstairs” problems.
03Restart the router properly
This is the cheapest fix there is, and it works more often than anyone admits. Do it properly:
- Unplug the routerIn plain words: The box that connects your home to the internet and passes data between networks.Technical: Forwards packets between networks. At home it is usually also the Wi-Fi access point and the DHCP server.Click for the full glossary entry’s power cable (and the modem’s, if you have a separate one). Do not just press a button.
- Wait 30 seconds. This lets it clear its memory.
- Plug the modem in first and wait for its lights to settle, then the router.
- Wait two to three minutes before testing.
Why this matters. Routers run for months and slowly clog. A restart clears stuck connections and often chooses a better channelIn plain words: Wi-Fi uses lanes of radio. If your neighbour is in the same lane, you slow each other down.Technical: 2.4 GHz and 5 GHz are bands, split into channels. On 2.4 GHz only 1, 6 and 11 do not overlap.Click for the full glossary entry at the same time.
04Forget the network and reconnect
If only your computer has trouble, make it forget the network and start fresh. Have the Wi-Fi password ready (it is usually on a sticker on the routerIn plain words: The box that connects your home to the internet and passes data between networks.Technical: Forwards packets between networks. At home it is usually also the Wi-Fi access point and the DHCP server.Click for the full glossary entry).
- Open Settings (Windows key + I).
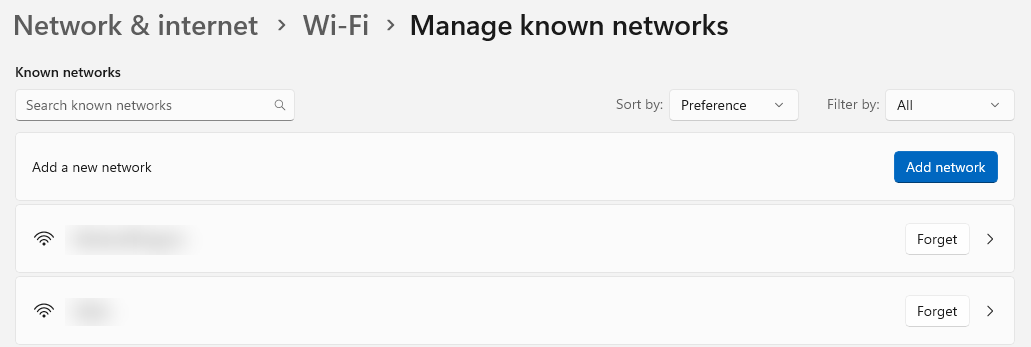
- Go to Network & internet → Wi-Fi → Manage known networks.
- Click your network, then click Forget.
- Click the Wi-Fi icon on the taskbar, choose your network, click Connect, and type the password.
Why this matters. Saved settings can get corrupted, for example after a router change. Forgetting forces Windows to negotiate a clean connection.
05Run the built-in troubleshooter
Windows has a helper that checks the common causes and fixes some automatically.
- Windows 11: Settings → System → Troubleshoot → Other troubleshooters → Network and Internet → Run.
- Windows 10: Settings → Update & Security → Troubleshoot → Additional troubleshooters → Internet Connections → Run.
Follow the prompts and read what it says it changed.
Why this matters. It is a free second opinion, and it can reset the Wi-Fi adapter without you needing to know how.
06Check the Wi-Fi adapter: power saving and driver
The adapter is the little radio inside your computer. Two settings cause a lot of dropped connections.
- Right-click the Start button and choose Device Manager.
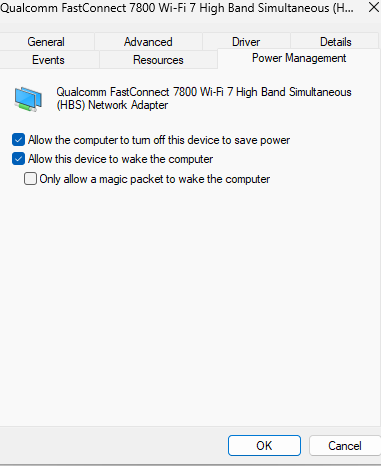
- Click the arrow next to Network adapters and find the one with Wireless or Wi-Fi in its name. Right-click it and choose Properties.
- Open the Power Management tab and uncheck Allow the computer to turn off this device to save power. Click OK.
- Back in Properties, the Driver tab has Update Driver. If problems started after an update, Roll Back Driver may be available.
Why this matters. Laptops aggressively switchIn plain words: A little extra word after a command that changes how it works, like setting the oven to “fan.”Technical: An argument starting with - or / that modifies a command, for example the -d in tracert -d. Each command has its own list.Click for the full glossary entry the Wi-Fi radio off to save battery, and some drivers handle that badly, so Wi-Fi drops after sleep or goes slow on battery.
07Pick a less crowded channel or band
Your routerIn plain words: The box that connects your home to the internet and passes data between networks.Technical: Forwards packets between networks. At home it is usually also the Wi-Fi access point and the DHCP server.Click for the full glossary entry talks on a channelIn plain words: Wi-Fi uses lanes of radio. If your neighbour is in the same lane, you slow each other down.Technical: 2.4 GHz and 5 GHz are bands, split into channels. On 2.4 GHz only 1, 6 and 11 do not overlap.Click for the full glossary entry, like a lane on a road. If your neighbours use the same one, everyone slows down.
- Find your router’s address. In a command promptIn plain words: A window where you type instructions instead of clicking. The shortcut name is cmd.Technical: Windows’ text-mode shell (cmd.exe). PowerShell is a newer one. On a Mac the equivalent is Terminal.Click for the full glossary entry run ipconfig and look at Default GatewayIn plain words: The door out of your network. It is your router.Technical: The router address your device sends traffic to when the destination is not on its own subnet. At home, often 192.168.1.1.Click for the full glossary entry, often 192.168.1.1. Type it into a web browser. (Most routers also have a phone app.)
- Log in (the password is often on the router’s sticker, and you should change it if it is still the default).
- Find the Wi-Fi or Wireless settings. For 2.4 GHz, set the channel to 1, 6 or 11, because those three do not overlap. For 5 GHz, auto is usually fine.
- Save, and wait for Wi-Fi to restart.
If devices are close to the router, use the 5 GHz network. It is faster and less crowded.
Why this matters. In apartment buildings, channel crowding is a top cause of slow evenings. Step 8 shows you which channels your neighbours use.
08No laptop? Measure with an Android phone
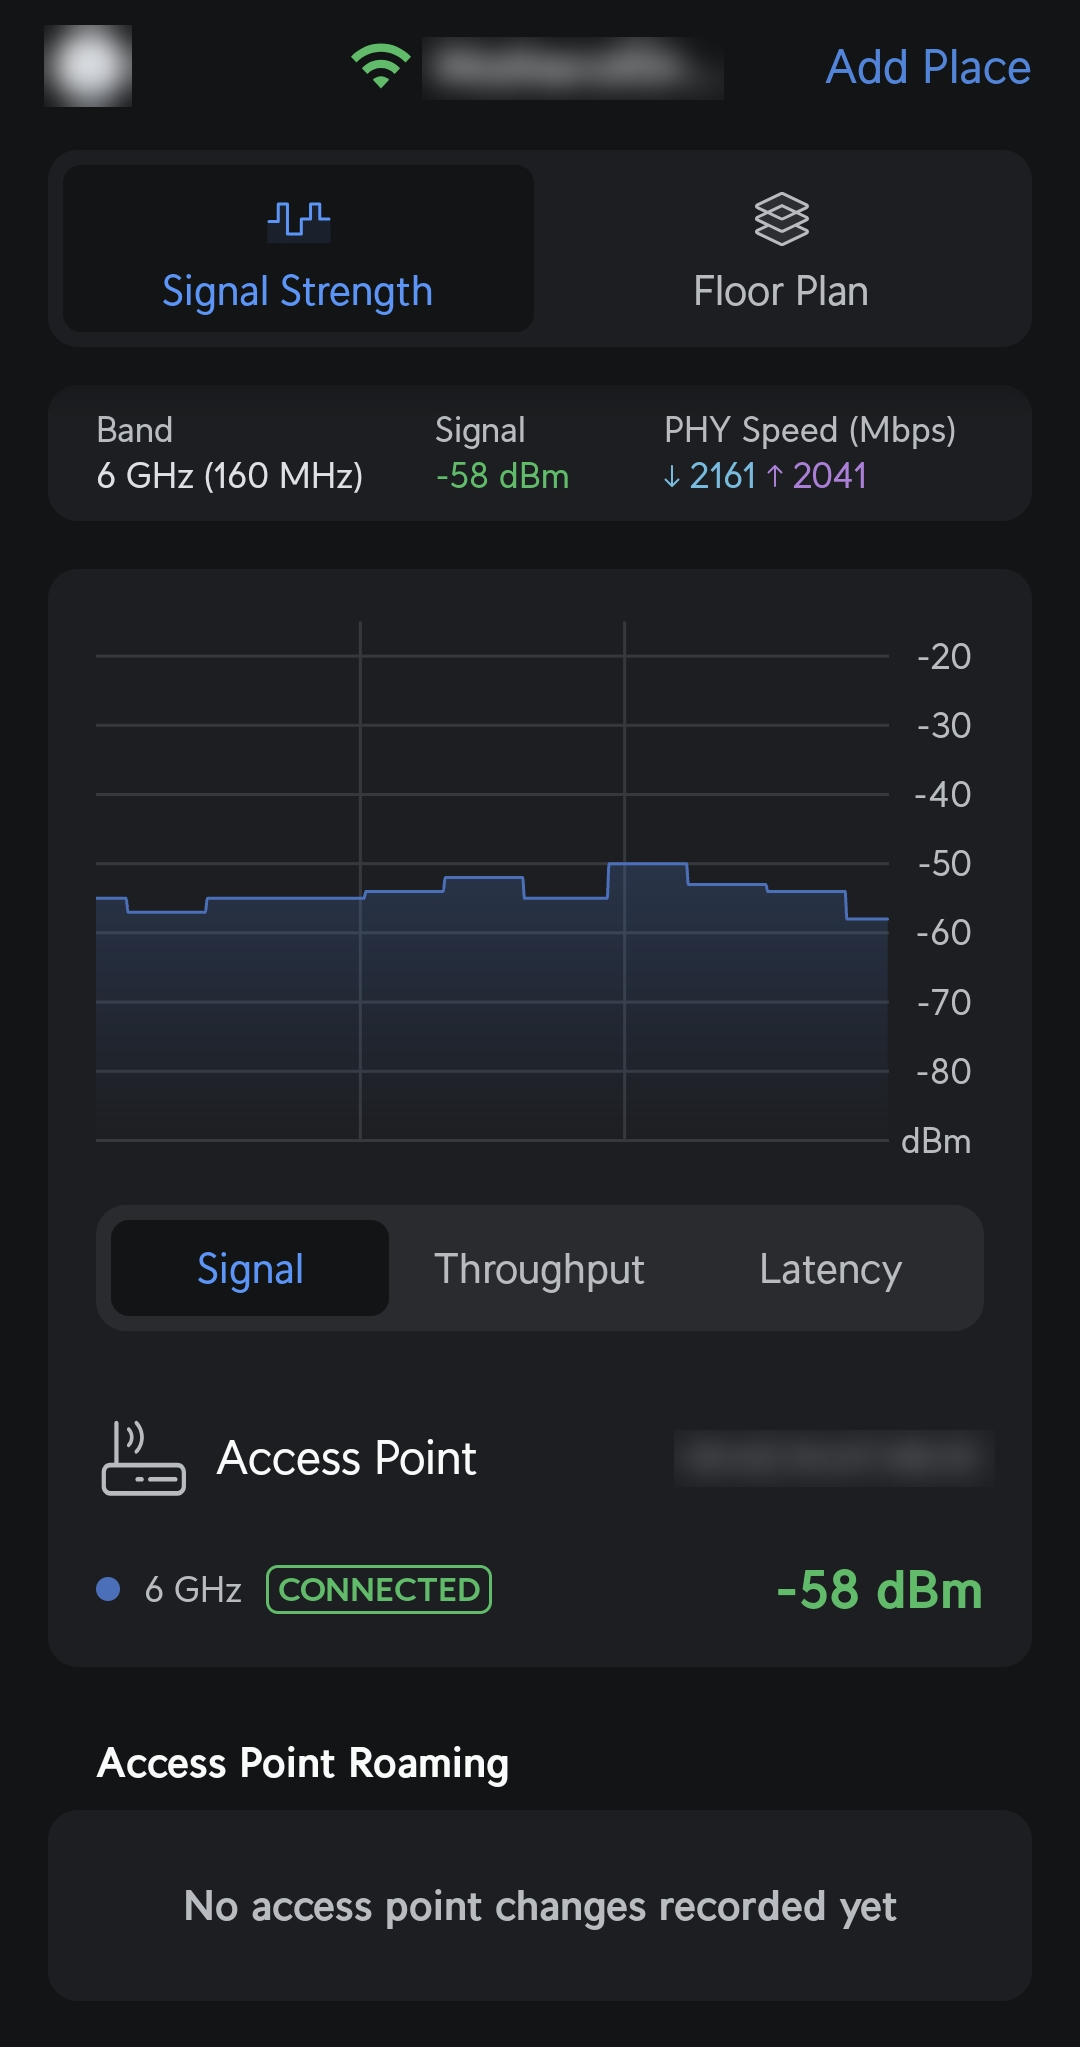
Few people carry a laptop around the house, and a phone can measure Wi-Fi nearly as well. Install a free Wi-Fi analyser only from the Google Play Store. Check the publisher name, because the store has copycats. A few well-known ones, so you can compare:
- WiFiAnalyzer (open-source) from VREM Software Development — free and open source, code on GitHub. Shows signal strength and a channelIn plain words: Wi-Fi uses lanes of radio. If your neighbour is in the same lane, you slow each other down.Technical: 2.4 GHz and 5 GHz are bands, split into channels. On 2.4 GHz only 1, 6 and 11 do not overlap.Click for the full glossary entry graph.
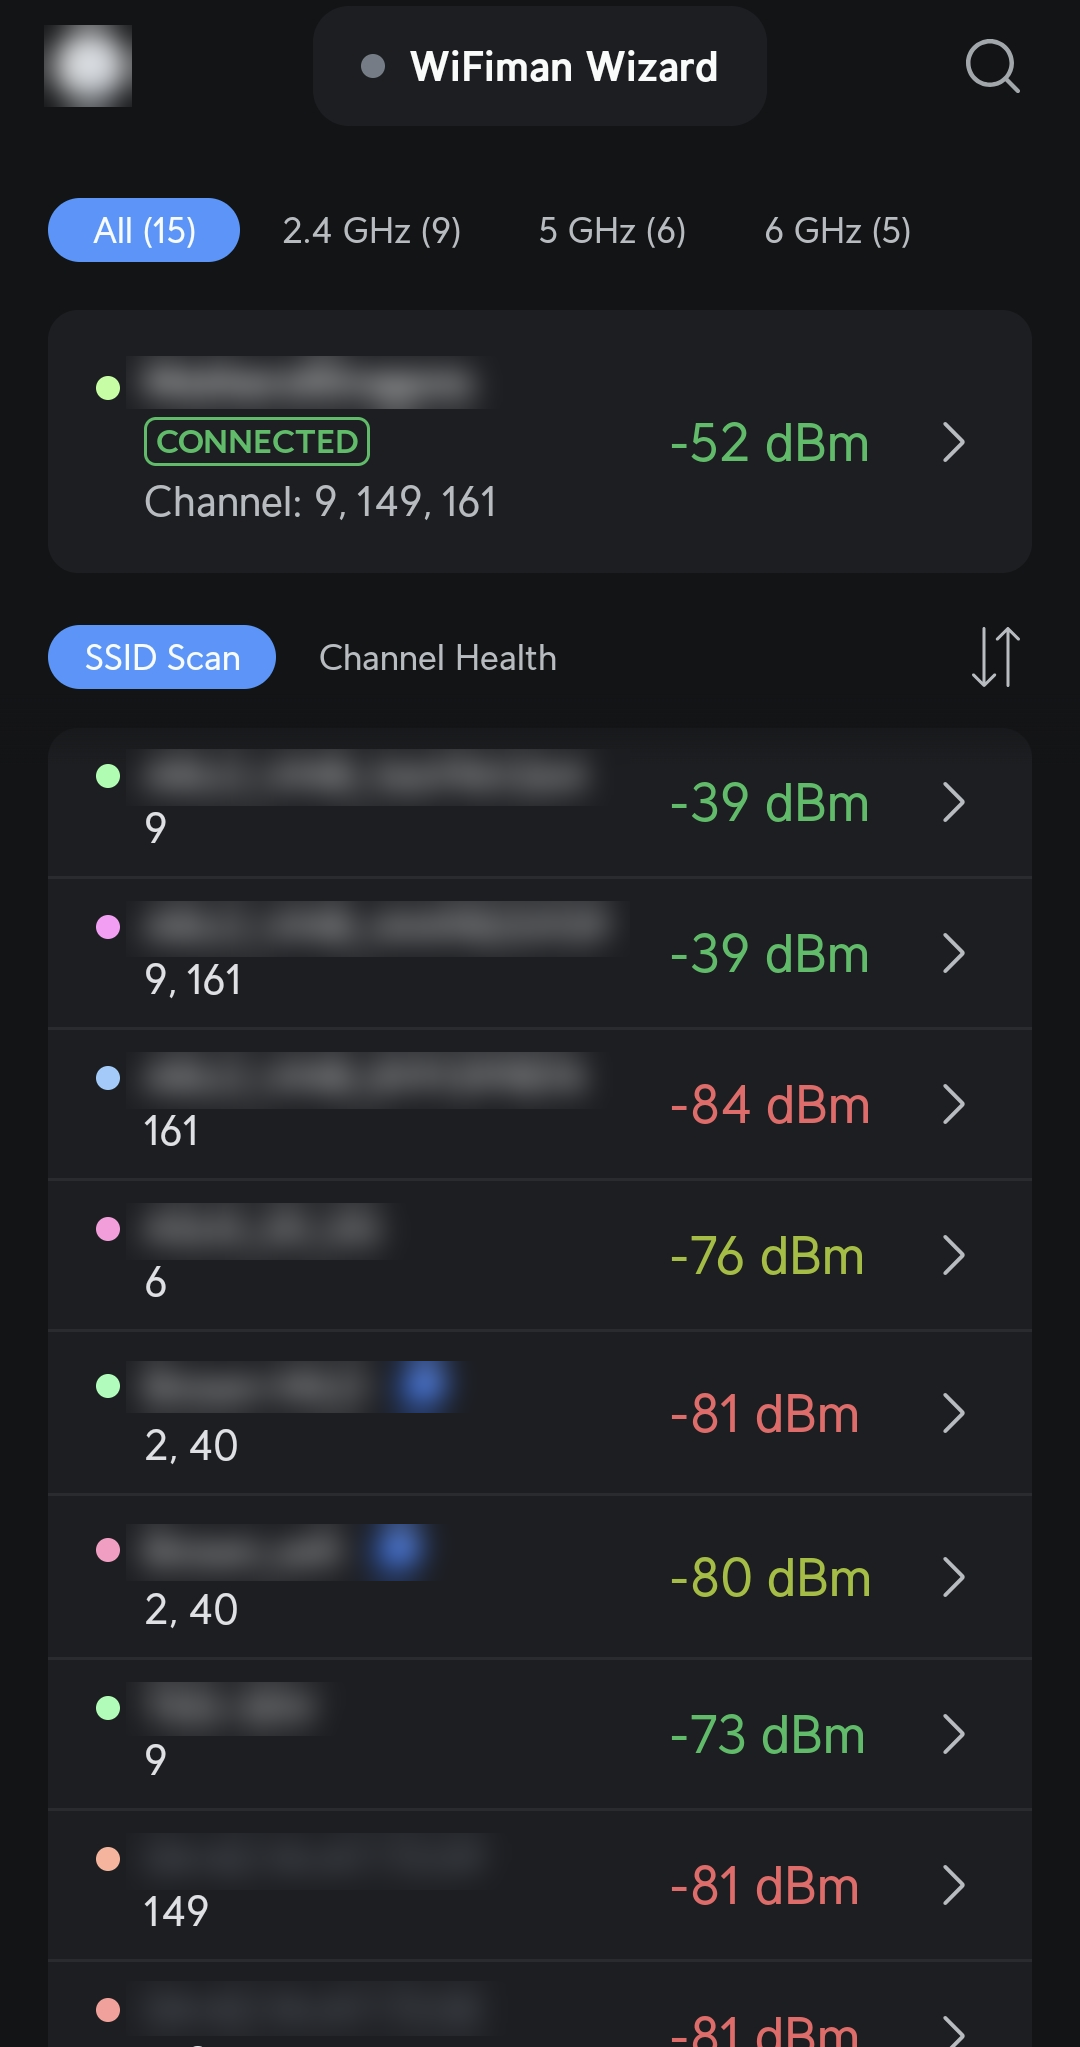
- WiFiman — free. Shows signal strength and channel use, with basic maps.
- NetSpot — free to download. It can draw a heatmap of your home, though some map types cost extra.
- Wi-Fi Analyzer and Surveyor — listed as free and ad-free by comparison sites, shows channel graphs and survey maps.
Which apps are free, and with how many ads, changes often. Read the store listing first.
- Open the app and allow location permission when asked. Android requires it for any app that scans for Wi-Fi. The app is not tracking you; Android treats Wi-Fi names as a location clue.
- Stand near the routerIn plain words: The box that connects your home to the internet and passes data between networks.Technical: Forwards packets between networks. At home it is usually also the Wi-Fi access point and the DHCP server.Click for the full glossary entry and note the signal in dBmIn plain words: How strong the Wi-Fi signal is. The number is negative, and closer to zero is stronger.Technical: Decibels relative to a milliwatt. Around −50 is excellent, −67 is good for video, −80 is weak, −90 is unusable.Click for the full glossary entry. Around −50 is excellent, −67 is good enough for video, −70 is okay for browsing, −80 is weak.
- Walk to the room with the problem and note the number again. The drop shows you where the weak spot is.
- Open the channel graph and see which channels the neighbours are on. Pick the emptiest of 1, 6 or 11 for step 7.
Heads up. Android 9 and newer only let each app scan about four times every two minutes, so the display may look slow or frozen. That is Android, not the app. iPhones generally do not let apps scan for nearby Wi-Fi at all, so use your router’s own app or a laptop there.
09Last resort: reset the network settings
Do this only if everything above failed. It removes all saved Wi-Fi networks and passwords and resets network adapters. Make sure you know your Wi-Fi password first, and expect a restart.
- Windows 11: Settings → Network & internet → Advanced network settings → Network reset → Reset now.
- Windows 10: Settings → Network & Internet → Status → Network reset.
When the computer restarts, reconnect to your Wi-Fi and type the password again.
Why this matters. It is the “turn it off and on again” of network settings. Because it wipes saved networks, it belongs at the end, not the start.
What you learned
- one device or all — decide which before fixing anything
- restart the router properly — unplug 30 seconds, wait 2 to 3 minutes
- forget and reconnect — a clean connection for one computer
- power saving off — stops laptops switching the Wi-Fi radio off
- channels 1, 6, 11 — the only three that do not overlap on 2.4 GHz
- dBm — closer to zero is stronger; −67 is fine for video
- network reset — the last resort
Tried it? Tell us
Nova drafted this lesson from Steven’s ideas. If a step broke, looked different on your screen, or you know a simpler way, tell us. Screens change between Windows and Mac versions, so your menus may not match exactly.
Go deeper
- DHCP explained — for the connected-but-no-internet case
- Why is my game lagging — when Wi-Fi is not the cause
- Networking glossary — SSIDIn plain words: The name of a Wi-Fi network, the one you pick from the list.Technical: Service Set Identifier: the network name broadcast by an access point.Click for the full glossary entry, channelIn plain words: Wi-Fi uses lanes of radio. If your neighbour is in the same lane, you slow each other down.Technical: 2.4 GHz and 5 GHz are bands, split into channels. On 2.4 GHz only 1, 6 and 11 do not overlap.Click for the full glossary entry, dBmIn plain words: How strong the Wi-Fi signal is. The number is negative, and closer to zero is stronger.Technical: Decibels relative to a milliwatt. Around −50 is excellent, −67 is good for video, −80 is weak, −90 is unusable.Click for the full glossary entry and more
Original walkthrough. The menu paths follow Microsoft’s current Windows 10 and 11 layouts and the app descriptions come from the apps’ own listings and comparison sites; none of the steps or apps has yet been run end to end by a person. If something does not match what your computer does, tell me and I will fix it.